Vision prototype photo
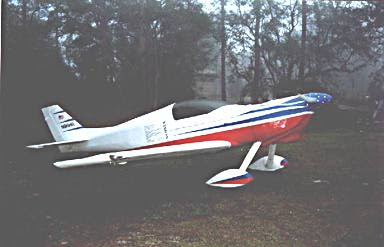
This is the Vision prototype designed/built by Steve Rahm in USA. and still being supported by Pro Composites Ltd. in USA. The aircraft is a 2 seat side by side, scratch built from a series of manuals. Built entirely of fiberglass and carbon cloth material the builder needs to know or learn some of the easy basics of composite construction. Building began Feb. 1998 in my spare time with 7 years where no building was possible. Building Hours at February 28, 2022: 4248.--------------------------------------------------------------------------------------------------------------------------------Some short videos of flights are at: https://www.youtube.com/channel/UCfxJXIwvmfNlNF3gwplFw7Q
Wednesday, September 4, 2019
Radio stack, Upper cowling fastening, Heat muffso
I am working on installing the radio stack in the middle of the panel. I fabricated a tray support structure and have three of my radio component trays installed. December 2020 radio components sold and revised panel will be Dynon radio and Transponder.
Thursday, August 1, 2019
Lower cowling blisters and new tail wheel stinger fabrication.
I vacuum formed a intake flange for the oil cooler. A three inch hose connects to a 3 inch flange on the port side air intake area of cowling.


Below the belly panel which was made of two layers of glass have been attached to the belly which cover the wing root areas as well as the exposed main spar.

Splash coat of carbon on the cowling where the oil access door will be cut out.

Blisters being made for the lower cowling.


A new tail wheel stinger has been made to support the Matco tailwheel and tail spring. Made out of steel which can be repaired or re-fabricated if needed during trips away from home base.

Sunday, September 30, 2018
Engine baffles and moved into new hangar.


Moved all my stuff into a new hangar and now have my Quickie Q2 and Vision together. All in one work space will make life easier.


Tuesday, June 12, 2018
Cowling blisters, panel support and control linkage brackets.


blisters to enclose. The exhaust is another major protrusion needing a cowling blister.


Wednesday, November 8, 2017
Air Intake Scoop
Nov. 8 2017
Today I completed the fabrication of the air scoop onto the lower cowling. I purchased an air scoop from a third party vendor and am modifying it to fit my cowling. Reshaping the air scoop was required and quite a bit of the flange and mating edges cut off. I needed to measure distance clearances of the air filter box to make sure it fit within the scoop. Once the scoop was modified it was bonded on to the lower fairing with flox. A layer of bid cloth on the bonded edge will also be required.

 I have anchored the lower cowling to the firewall flange using 8/32 machine screws with anchor nuts riveted onto the back side of the flange. I am using 18 screws to hold the lower cowling in place.


 The upper cowling has been trimmed to fit in place but is just resting in place at this time. I will be installing Camlock 1/4 turn fasteners to hold the upper cowling in place. I prefer the quarter turn fasteners on the upper cowling for ease of removal which allows quick removal for visual inspection of the engine compartment.

Today I completed the fabrication of the air scoop onto the lower cowling. I purchased an air scoop from a third party vendor and am modifying it to fit my cowling. Reshaping the air scoop was required and quite a bit of the flange and mating edges cut off. I needed to measure distance clearances of the air filter box to make sure it fit within the scoop. Once the scoop was modified it was bonded on to the lower fairing with flox. A layer of bid cloth on the bonded edge will also be required.


Tuesday, October 31, 2017
Air Filter and Intake
October 31, 2017
I have completed building the air box system that will include the air filter. The air box is attached to my Rotec Throttle Body unit which is also a compact unit and helps to reduce the vertical space of the front lower cowling. The original carburetor that came with the engine was about seven inches deep vertically and would have made for a poorly streamlined front engine cowling. The air box has a clever flapper door at the front for allowing heated air from a heat muff into the intake when required. The door on the hot air intake closes off the ram fresh air, maximizing the hot air volume.
 October 15, 2017
Building up the air box system. The kit is from Vans aircraft which is used on most of their various aircraft. I like the system because it is compact and yet allows ram air and a real good K&N oiled filter. this is a one time purchase round filter which can be used over and over by cleaning and re-oiling. They are widely used on numerous performance cars. It took a bit of time for me to build up the kit but am very happy with the final product.


I have completed building the air box system that will include the air filter. The air box is attached to my Rotec Throttle Body unit which is also a compact unit and helps to reduce the vertical space of the front lower cowling. The original carburetor that came with the engine was about seven inches deep vertically and would have made for a poorly streamlined front engine cowling. The air box has a clever flapper door at the front for allowing heated air from a heat muff into the intake when required. The door on the hot air intake closes off the ram fresh air, maximizing the hot air volume.

Building up the air box system. The kit is from Vans aircraft which is used on most of their various aircraft. I like the system because it is compact and yet allows ram air and a real good K&N oiled filter. this is a one time purchase round filter which can be used over and over by cleaning and re-oiling. They are widely used on numerous performance cars. It took a bit of time for me to build up the kit but am very happy with the final product.


Friday, October 13, 2017
Propeller and Cowling fitting
October 13/17
It has been very time consuming to get the fit of the cowling trimmed for final position. Thanks to Scott I was able to purchase a pre-made cowling for my project which saved me a great deal of work. The cowling fits very well and will require me to build up my flanges in a few areas to get the cowl to meet the fuselage perfect. There are also two areas I will have to build up the cowling aft upper edges to meet my fuselage correctly. Trim fit trim fit trim fit, 30 some times before I got it to where it fit best.


September 29/17
The constant speed propeller has been mounted to the engine with great assistance from my hangar neighbor. Alan had a Whirlwind propeller on his past RV6 and was very helpful in getting my spinner and prop temporarily mounted. Not having worked on the install of a CS prop I was grateful for the teaching course. I am now slowly working on trimming the lower cowling to fit the airframe.


Subscribe to:
Posts (Atom)