Vision prototype photo

Vision prototype photo
This is the Vision prototype designed/built by Steve Rahm in USA. and still being supported by Pro Composites Ltd. in USA. The aircraft is a 2 seat side by side, scratch built from a series of manuals. Built entirely of fiberglass and carbon cloth material the builder needs to know or learn some of the easy basics of composite construction. Building began Feb. 1998 in my spare time with 7 years where no building was possible. Building Hours at February 28, 2022: 4248.--------------------------------------------------------------------------------------------------------------------------------Some short videos of flights are at: https://www.youtube.com/channel/UCfxJXIwvmfNlNF3gwplFw7Q

Tuesday, December 1, 2020

Canopy Latch Torque Tube

 December 2 2020

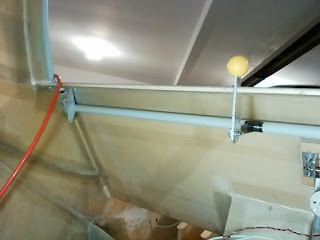
I had bought a canopy latching torque tube from Vans as they use on the RV6 tip up canopy.  Some parts I wouldn't be able to use but the method of latching was sound.  This torque tube goes just under the seat back and across the fuselage hanging in Nylon blocks at each outer end.  The nylon blocks are the ones that came in the kit from Vans and are anchored to the seat back.  I had my welder weld on a center arm that has the yellow release knob attached to it with a secondary short metal arm.  The knob comes up and forward going into the aft edge of the seat back about 1.5 inches.  Only a narrow .25" slot was needed to be cut into the seat back upper horizontal section to allow the knob to come forward.  It will have a locking tab installed later as a safety lock for in flight.  This was a lot of tricky work and took some time to get all configured.  Another detailed drawing of my dimensions was recorded for my future reference.


The outer end of the port tube I had a hex socket welded in place and so my entry key is just a hex key adapted with a 3 inch handle welded onto the short end  of the hex key.  Remove the hex key and there is only a .25" round hole exposed.  Hey loose a key, just get another from the hardware store.

Photo later

The upper canopy will have the mating receivers installed that were part of the Vans canopy latch package.  these will be done sometime later.

Photo later

Monday, November 16, 2020

Pitot and Static Connections

 November 16 2020

The pitot static vents have been installed on the aft fuselage sides.  As is done on Vans aircraft I have just used a Aluminum pop rivet outer shell and it is just the proper size to allow the plastic tubing to be friction fit on.  I believe the tubing is .17 ID and .25 OD and I am using just a common hardware store clear tubing.  My Pitot airspeed tube has be fabricated to mate to the chrome extension and connected to the plastic pitot tubing in the wing.


Thursday, November 5, 2020

Flaps and Flap Motor Assembly

 November 5 2020

Assembly of the flaps and the flap drive motor onto the fuselage are beginning,  Most was previously fabricated but now needed to be installed and all connected up. The slotted flaps with a curved leading edge allow air to flow over the flaps as they are deployed.  These are hinged on the bottom of the wing using external hinge hangars.  As flaps are dropped back there is a air opening that will allow some under wing air to flow over the tops of the flap surface.  Drive motor was installed which hangs on the back side of the passenger seat and drives a torque tube for the flaps.  Each end of the torque tube has a forked fitting to mate with rod end bearings on the flaps.  The flap motor was installed with the electronic flap positioning unit sold from Vans.  It took quite a bit of setting up but it now works setting the flaps to 6 degrees, 12 degrees and 33 degrees.    


The rod end bearings and fork go above my wing root fairing about 1 inch and so a rectangular hole had to be cut open.  This rectangle will end up with a blister of fiberglass over it to hide this opening which is in the No Step zone of the wing.

Below is the flap motor and flap torque tube showing below it.  The electrical wires are to the motor and the flap positioning unit, which presets the flap extension for 6, 12 and 33 degrees.  At the bottom of the drive motor is a block of wood bonded to the side of the tunnel, this is a safety to stop the motor/drive arm from being able to ever go over center.  Were this able to happen the flap mechanism would  lock up in the down position.  The flap switch on the panel allows a tap of the switch for each down position and moving the switch to up retracts the flaps fully.


Thursday, October 8, 2020

Primer Filler base Finally All On

 October 6 2020

After getting started on primer filler on the fuselage earlier I finally got all of the spraying done.  It took two coats on everything.  I even added a light 3rd coat on some parts of the underbelly, I want to reduce the times I have to go upside down if I can.  I am not an aerobatic pilot  so don't do inverted well at all.  Cleaning out the spray gun every second day is as much work as getting the primer/filler all set up for spraying.  I have done that enough times, getting to be expert now.  Correction, never expert as I am only a hobby building guy with lot's to learn.  Airplane is sprayed, control surfaces and Canopy.  I am happy with this base coat but there will still be long boarding finishing to do after I test fly the plane.  Here are a few final primer/filler pics.


Below are two elevators and rudder primed.

This is one Flap and two ailerons primed.

Here is the finished product inside the hangar with the upper engine cowling sitting in place.  I am very happy with the look of this airplane, the work has all been well worth it.

The canopy has turned out really well.  Detailed masking with painters tape around the micro line at the bottom edge of the plexiglass has paid off with a nice finish line.


Friday, September 18, 2020

Puttying and Sanding and more Puttying and Sanding and finally Primer Filler

 September 18, 2020

For this month of September I have been doing some more filling and sanding but this time I have been using 2 part Lightweight Finishing Putty.  I really like this product which sets up in 1 hour and can be sanded if you wish.  I am using the NAPA product but most all shops sell something like this.  I tend to go at finding all spots that need attention mark them with a piece of painters tape and then go after filling the locations.  A day later I spend the day sanding down the spots.  This routine continued for three weeks until it was good enough for my liking.   Of course I was getting very tired of this routine by now.  It won't be smooth like factory made skins.  The primer/filler is Featherfill G2 lightweight, I find it is going on very nice for me.  It is thinned 5% with Acetone using my HVLP gun with a #18  tip.  It is leveling and filling holes and scratches as I had hoped.  I am going to leave it in primer/filler for quite a long time so I can tackle areas needing more attention even after test flying.  Hopefully summer 2021.

Final puttying & sanding

 
More P&S
 
Featherfill G2 going on the fuselage.


Wind came up so moved into the open hangar for more painting
 
Fuselage now has two coats of Featherfill G2


Tuesday, July 7, 2020

Filling & Sanding & Filling & Sanding & Filling & Sanding


 July through August 2020

Two full months of filling and sanding the airplane with micro filler.  This is quite a chore and all who walk by the hangar say I must have a lot of patience and more than they.  Micro/epoxy is my choice of fill material on all low spots on the plane.  First off it is the lightest filler that you can use and is the least expensive if you are mixing it up yourself.  As is mentioned in literature it needs to be roughly the consistency of whipping cream but must have all shinny reflection out of the mix by adding enough micro-balloons.  The trick is to get it thick enough that it will sand quite easy but still be wet enough that you can spread it ok.  This took me a while to get consistency.

Two ailerons on the wing, two flaps on floor and rudder. 
 
The canopy came with a protective rubberized spray on coating inside and out.


Friday, May 15, 2020

Fuel Tank Testing

May 15, 2020
Today I finally got back working on my Vision airplane once again.  I have been busy spending a lot of time on my other airplane a Quickie Q2.  Today I began testing the fuel tank integrity on the starboard wing.  My objective was to make sure  there were no leaks from any fittings or from the wing tank sealing.  It all turned out great with no leaks anywhere.  First was the addition of 5 gallons of 100 ll fuel into my leading edge wing tank.  After a 1 hour check was good an additional 5 gallons was added, then 30 minutes later 5 more and all good a final 5 gallons added for a total of 20 gallons in the right wing.  Testing of the Facet fuel pump was next and it pumped an adequate fuel volume out of the open gascolator.  A small amount of fine particles were noticed from the output into a clean white bucket.  At this point I quit and will flush the  tank a few times using the tank bottom drain to clear out the fine debris. I don't want to plug up the gascolator or inline fuel filter.

Thanks to my wife  Adele for her great job assisting painting the interior of the fuel cells with Jeffco fuel sealant prior to closing them.  Total fuel volume appears to be 20 US gallons (77 liters) in the right wing fuel tank.  The left wing tank will be the same and I will update when it's completed.

May 19, 2020 The left fuel tank was tested with 10 gallons of fuel to check for leaks.   A day later a minor weeping was found from a wing root fitting, it was re-sealed and tightened after removing fuel.  Added 20 gallons and let sit for 4 days and it was without any leaks.